Hi Bella Crafts lovers! Today I want to show you a super fast and easy tutorial for making a Faux Enameled Glass vase, using Wendy Vecchi’s technique with a little twist, as well as using her products. It took me an hour to make this vase, allowing cooling time between colors, and the vase is 10 inches tall. Enjoy!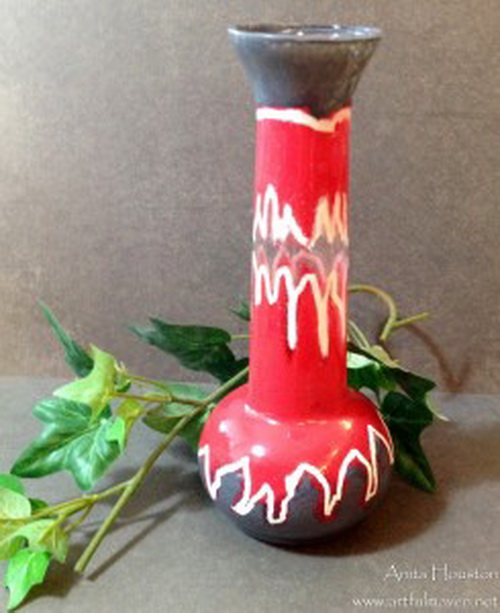
Supplies:
- Glass Piece
- Heat Tool (I used a WOW Embossing Tool)
- Ranger Wendy Vecchi Archival Ink: Red Geranium, Watering Can
- Ranger Emboss It Pen: Clear
- Ranger Mini Ink Blending Tool with 2 Clean Pads
- Ranger Wendy Vecchi Embossing Powder: Red Geranium, Watering Can
- Ranger Embossing Powder: Seafoam White
- Sheet of Scrap Paper
- Clean and Dry Small Paintbrush
Instructions:
 NOTE: You must be very careful not to overheat the glass, or you could break it and injure yourself. Always work in smaller spots, and take time to let the glass cool before moving on to another spot.
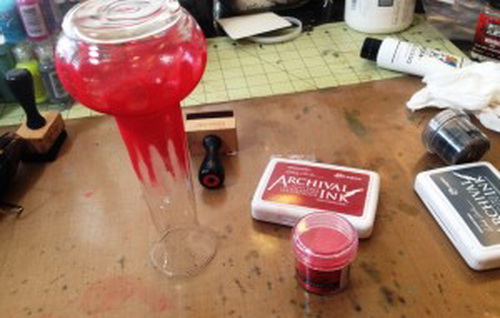
- I like to work with one color at a time, and from bottom to top so I can hold on to the glass easily. Using a blending tool and the first color of Archival Ink, begin inking the glass where you want the color to be. Lay the glass on a sheet of paper for easy clean up.
- Quickly pour the coordinating embossing powder over the area you inked. If you have powder where you don’t want it, just rub it away. I did this to make it look like the enamel was running down.
- Remove the bottle from the paper and fold it in half and pour the powder back into the jar.
- Hold on to the glass and begin heating it with the heat tool. It will turn from powder to a hardened enamel. If bare spots appear, keep heating until the enamel fills in. Let the glass cool down.
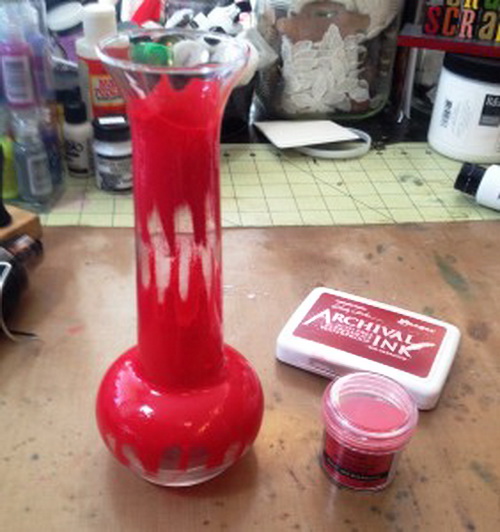 When the glass cools, follow the same procedure as before and do another area, rubbing off the powder where you don’t want it before heating.
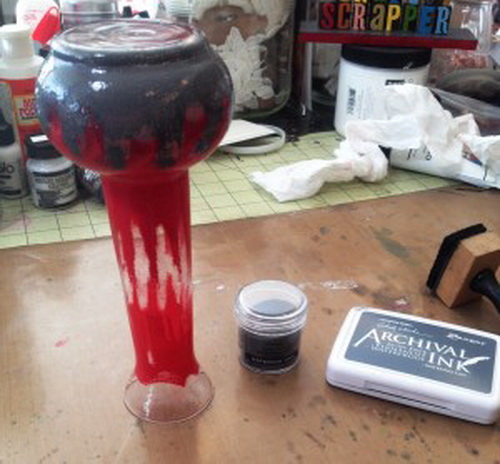 When you are ready for another color, do the same as before using coordinating Archival Ink and embossing powder. It’s okay if you overlap the colors. The top color will over the bottom. I left the middle bare so you could see the natural glass.
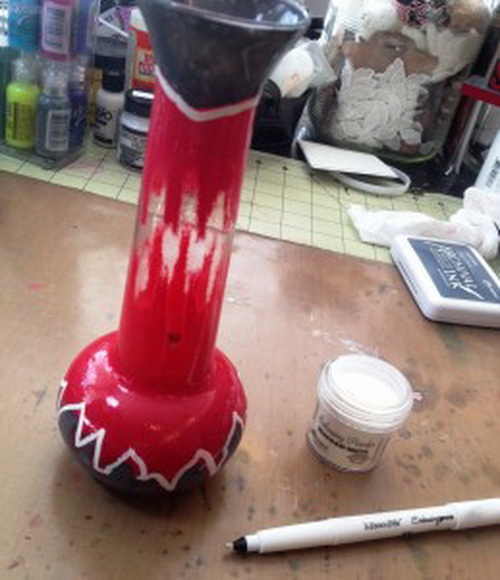 To divide the colors on the vase or to make designs, use the Emboss It Pen to draw on your design, again working in smaller areas.
- Lay the piece on the paper, and pour the seafoam white powder on. Pour the extra back in the jar. If any white powder is sticking to the enamel, simply brush it away with a clean paintbrush. Heat emboss this. Continue until the look you want is achieved.
[Tweet “Easy tutorial for making a Faux Enameled Glass vase. #crafts #faux #enamel”]
What is so very cool about this, is that the enamel looks like it’s inside the glass, but it’s not. The results are just striking. I hope you give this a try. You can see more pictures of the vase on my blog as well. Until next time, happy crafting! ~ Anita Houston
Products Featured in today’s blog post:
Anita, I would say this is a feat of engineering! I love how you created the pattern with the EPs and your colour choices are fantastic. I have tried one colour but you have inspired me to have a go at something similar now….. love this! Anne xx
Thank you so much Anne!
Amazing and so very clever! Genius creation really!
Thanks Astrid!!! I appreciate you!
Absolutely awesome technique Anita!
Thanks Lisa!
This is so cool Anita! I need to try this one, thanks so much for sharing!
Thanks Carmen! Do try it!!!
That is seriously cool! I never would have thought that was a glass vase. Surely you must have thrown that on a wheel…that is incredible looking! Love your vase.
I know right?!!! Thanks so much!!!
This is a great tutorial. Love the project.
Thanks Lisa!!!
What a great idea – I want to try it with mason jars for a little twist! Thank you so much for the tutorial!
:) Molly
Hey! That’s a great idea, Molly!
This is amazing!!!
Greeting,
What a fun way to add some colors! This would make wonderful gifts.
Love and light,
Michele
Thank you…I think so too!
So much inspiration and another something to try. I wish we have 36 hours a day for our crafty experiments
You and me both Irit! Time is not on our sides…lol! Thanks so much!