Hi everyone, Martha Lucia here with an interesting idea to share with you.
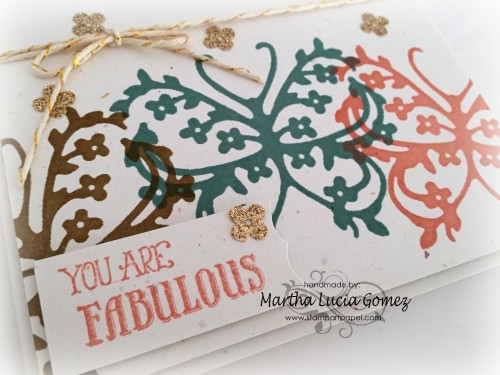
I love die cuts and I love stamps, but they don’t always come together or coordinate well. So after looking at a lot of tips I found a great idea to move from die cuts to stamps and you will see this in today’s card.
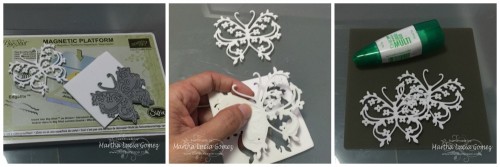
The butterflies on my card aren’t stamps, they are a die cut from DieNamites, called Flowery Butterfly, that I converted into a stamp using it with the big shot or any die cut machine, a piece of thin foam sheet, Tombow Liquid Glue, and a clear block.
The first thing that you have to do is select your die cut. I am using a butterfly. I cut it twice from a thin foam; I don’t need any shim or wax paper to pass it through my big shot. I used the magnetic platform and I didn’t get any resistance when I rolled it through.
Then I used Tombow Liquid Glue to attach the butterflies together. After this I added a light layer of liquid glue to one side of the butterfly and let it dry. This glue gave me the stickiness that I needed to made my new stamp easy to re-position once it dried, and then attach it to the clear blocks.
Now my stamp is ready and I used it with dye inks in different colors. I cleaned it each time with a baby wipe to switch between the colors.
To create my card I selected Confetti White Cardstock and Crisp Cantaloupe, Lost Lagoon, and Baked Brown Sugar Classic Inks. I decorated it with gold baker’s twine and some little flowers that I cut from glimmer champagne paper.
[Tweet “create stamps with your die cuts! #crafts #stamps #cards”]
With this idea we have hundreds of opportunities to create our own stamps and now it is your turn to experiment with new looks. Thank you for stopping by and come back soon for another quick idea!


Excellent tutorial, Martha, and your card is beautiful.
Great way to make more stamps! (Not sure we need more…) Will try this techiques soon. Thanks!
What a super cool idea!! I have so many dies, and now I can make all of them stamps!! Thanks so much for this awesome tutorial!
xxDaniella
This opens up so many possibilities – coordinating die cuts and stamps in designs without the extra cost of having to buy separate stamp sets – brilliant! Thanks for sharing!
What a great idea! I don’t have a big shot, but I’m thinking I need to get one! Thanks for sharing!
Such an awesome and effective technique! I LOVE this! Pretty card too!
What a great tutorial and creative use for the die cuts. Love the card!
This is a great tutorial Martha! I absolutely love this idea!!! Fabulous card too!!!
Wow that is a great idea!
Greetings,
Great tutorial……….love making the most of our toys.
Love and light,
Michele
I have all these colors and have never used them together. Thank you for posting.