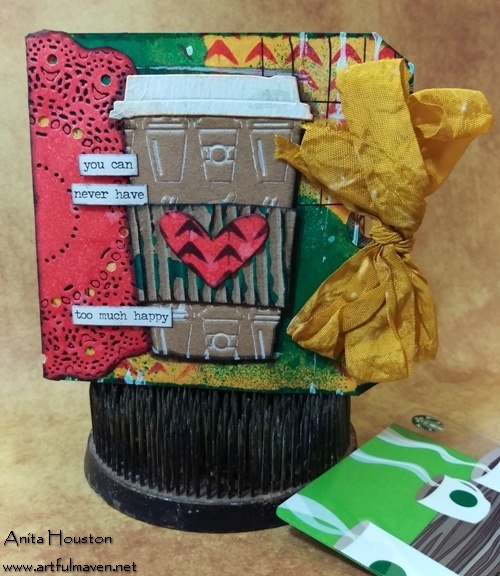
How about making an artsy coffee-motif gift card holder for the coffee lover in your life?!! Let’s get started!
 Materials Needed:
- Craft Sheet
- Ranger Surfaces #10 Manilla Tag (2)
- Ranger Tim Holtz Distress Ink: Fossilized Amber, Festive Berries, Black Soot
- Tim Holtz Idea-ology Crinkle Ribbon, Textured Surfaces, Small Talk Stickers
- Ranger Dyan Reaveley Dylusions Ink Spray: Vibrant Turquoise
- Tim Holtz Collection Layering Stencil: Tracks
- Ranger Tim Holtz Distress Paint: Picket Fence
- Ranger Fude Ball Pen: black
- Ranger Tim Holtz Distress Spray Stain: Fossilized Amber
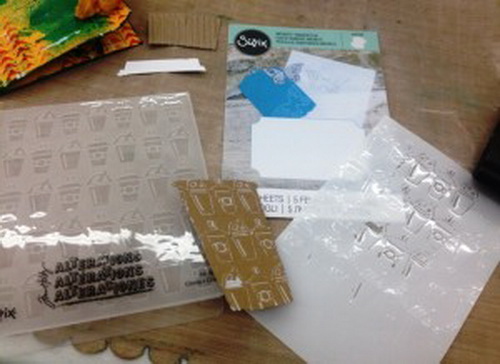
- Sizzix Tim Holtz Alterations Texture Fade: Doily, On The Go
- Ranger Collage Glue Stick
- Sizzix Inksheets Transfer Film: Black, White
- Ranger Surfaces: Kraft Cardstock, Watercolor Cardstock
- Sizzix Tim Holtz Alteration Bigz Die: Fresh Brewed, Heartfelt
Tools:
Scissors, Ranger Mini Ink Blending Tool, Tim Holtz Idea-ology Distress Sprayer and Design Ruler, Ranger Heat Tool, Ranger Craft Scraper, Die-cutting/Embossing Machine, We R Memory Keepers Crop-A-Dile or Hole Punch
[Tweet “Create a gift #card holder for the #coffee lover #crafts #ink #cards”]
Instructions:
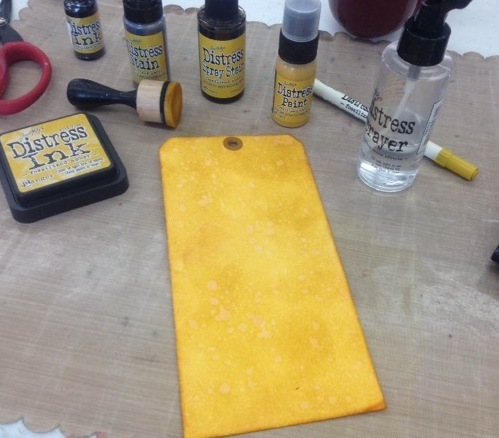 Using the blending tool ink one of the manilla tags with amber Distress Ink, covering it completely. Mist or flick water on it to make droplets over the whole tag. Dry with a heat tool. Do the same to the back. Do the same thing to the other tag using Festive Berries instead, but do not do the back.
- Taking the amber tag, mist Vibrant Turquoise randomly onto it making larger splotches. Dry, and then do the same to the back side. Lay the Tracks stencil over the horizontally laid tag, and ink in the tracks using Festive Berries. Do the same to the back.
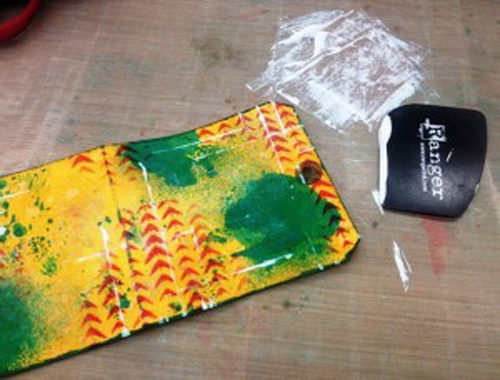
- Add a small amount of Picket Fence Distress Paint to the craft sheet. Spread it out using a craft scraper, and collect paint on it’s straight edge. Run the scraper over the tag randomly making tick tack toe designs. Dry. Do the same to the back of the tag. When it’s dry, add lines in the same pattern as the white paint to the tag using a Fude Ball Pen and the Design Ruler as your guide. Fold the tag in half to use as a card base.
- Trim two inches off the Festive Berries tag (the part with the tag hole); this will be the inside pocket for the card. Set it aside. Trim another 1 1/2 inch strip off of the tag, and die cut it with the Heartfelt Die to get a small heart from it. I did a few with the strip that I had. The remainder of the tag will be for the doily.
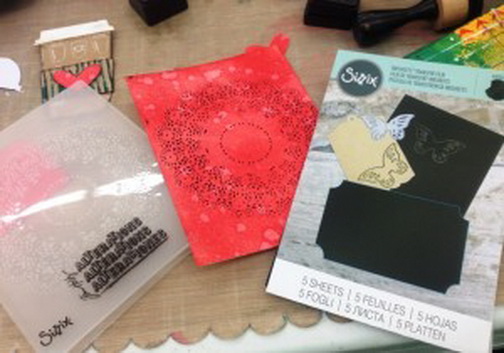
- Place the Festive Berries piece into the Doily Texture Fade, ink side up. Lay a black piece of the Inksheets Transfer Film over the Festive Berries Piece. Close the Texture Fade and run it through your die cutting/embossing machine. When you open up the Texture Fade, the image will be embossed and ‘inked’ by the transfer film (Think carbon paper!). It’s so easy to do, and alleviates the inking of the Texture Fade to add color. Great new product! Trim around the doily, and ink the edges with Black Soot. Fold it in half, and place it onto the card itself over the fold, and secure it with Collage Glue Sheet.
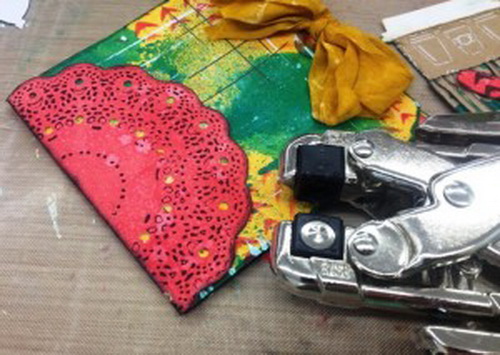
- Trim around the doily, and ink the edges with Black Soot . Punch through the doily to add designs to it with the Crop-A-Dile. Fold it in half, and place it onto the card itself over the fold, and secure it with glue. Mist a piece of Crinkle Ribbon with Fossilized Amber Distress Spray Stain. Add a few dabs of the Picket Fence Distress Paint to the ribbon, and then crinkle up to dry. Tie this onto the tag card’s hole into a bow.
- Die cut the to go coffee cup from the Fresh Brewed Die, using kraft cardstock for the cup, watercolor cardstock for the lid, and corrugated paper for the cup ring protector. Cute huh?
Lay the kraft cup portion into the On The Go Texture Fade. Lay a piece of the Inksheets Transfer Film in white over it, and emboss with your machine. FUN! Ink the edges of the cup, the lid, and the protector with Black Soot. Adhere the lid onto the cup with the glue stick. Spray a very small puddle of Vibrant Turquoise onto the craft sheet, and run the corrugated side of the protector over it. The ink spray will only be on the raised ridges. Dry. Adhere it onto the cup, and a heart onto the middle of the protector. Adhere the finished to go cup onto the tag card using the glue stick, and add the sentiment with the Idea-ology Small Talk Stickers. To finish the tag card, adhere the two-inch piece of Festive Berries tag (The part with the hole.) into the inside of card, running the glue stick only on the bottom and right side of the piece and stick it on. Add your gift card, and your tag card is ready to brighten someone’s day!
To see more photos of the finished tag card, please visit my website. Thanks, and I’ll see you again next month! ~Anita Houston
GREAT project Anita!
Thanks Roberta!
Anita – this project is adorable – I’m going to try it out!
Molly
Cool! Glad you like it!
This is so cute! It’s perfect for a coffee lover, great job!
Thanks Carmen!
Fabulous gift and fabulous tutorial!!
Thanks so much Jackie!
This is soooo super cute!! Absolutely love it!!
xxDaniella
Thanks Daniella!!!
Anita, I so love this project and all the details you shared. Love what you did with that doily EF as I thought it was a die! Great design and so many fabulous layers! Love it!
Thanks so much Terry! I love that Texture Fade!
Anita, I love all the products and techniques that you use in this wonderful project. Congratulations you made and excellent creation. Hugs!!!
WOW…thanks Martha!
Love this project Anita!
Thanks for stopping over Maura..appreciate you!
Fabulous tutorial, Anita!! Such a happy gift card holder!! XOXO-Shari
Glad you think so Shari! Thanks for coming over!
Greetings Anita,
Fun project and tutorial.
Love and light,
Michele
Thanks so much Michele!
Wow! Anita anyone would be lucky to get that card. I love coffee stamps. Really nice job.