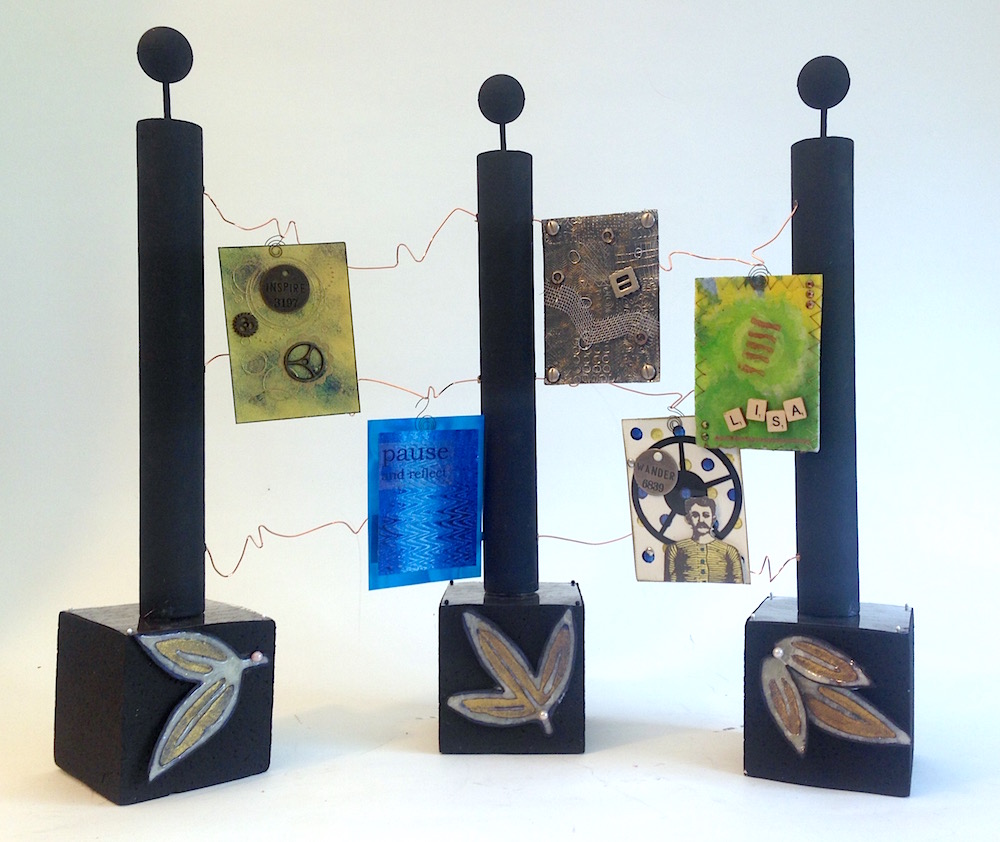
I really love making and swapping artist trading cards. Over the years, my collection has grown to more than 350 ATCs. They are too beautiful and inspiring to hide away in boxes or albums, so I keep them on display.
The walls of my studio are filled with ATC trays which I love, but now I’m looking at other ways to display these miniature works of art. I made this little “ATC fence” to sit on a shelf near my desk.
In keeping with my self-imposed challenge for each project I create for the Bella blog, I used only supplies and tools I had on hand. Make and make do…it’s all about #CraftYourStash, baby!
I’ve had these three hollow 9″ long cardboard tubes sitting in a bin forever – they were cores from the old thermal fax paper rolls. They’re super thick and sturdy like wood dowels, so I saved them…knowing that someday, somehow, I would find a fun way to use them.
I really like working with lightweight materials instead of wood (like Smoothfoam!) because they’re cheaper and more versatile – plus no power tools are required and no sawdust everywhere.
Supplies:
- Three 9″ sturdy, hollow cardboard tubes
- Three 3″ Smoothfoam cubes
- Three 1″ Smoothfoam balls
- Black gesso (it dries quickly with a flat finish and no brush strokes)
- Air-dry clay, pea gravel, 3 large metal washers
- Heavy-duty craft glue
- Heavy-gauge wire and 6 small beads
- Round-nose beading pliers
- Craft drill (hand-winding), wire cutters, craft knife
- Paint brush, sandpaper, wood skewers, cutting mat
- Clear or patterned acetate, mini decorative clips

1. Paint the tubes black, then use a craft drill to put 3 holes on one side of two tubes (for outer posts), and drill through both sides of the third tube (for center post).
2. Cut three 20″ lengths of sturdy wire. Thread each wire through the holes in the first outer post from the inside out. Place a bead on the interior end of each wire and coil the tip of the wire with beading pliers to hold the bead in place.
3. Thread the center post on to the wires, then add the second outer post, securing the wires with beads inside.
4. Plug the bottom of each post snugly with a large ball of air-dry clay and flatten the clay flush to the post rim. Fill the hollow core of each post with small gravel to give them more weight. Plug the tops with another ball of clay.
5. Push a 6″ wood skewer into the bottom of each post, through the clay, leaving about 4″ exposed. Smudge and flatten the clay snugly around the skewer. These will be pushed into the cube bases for each post later.
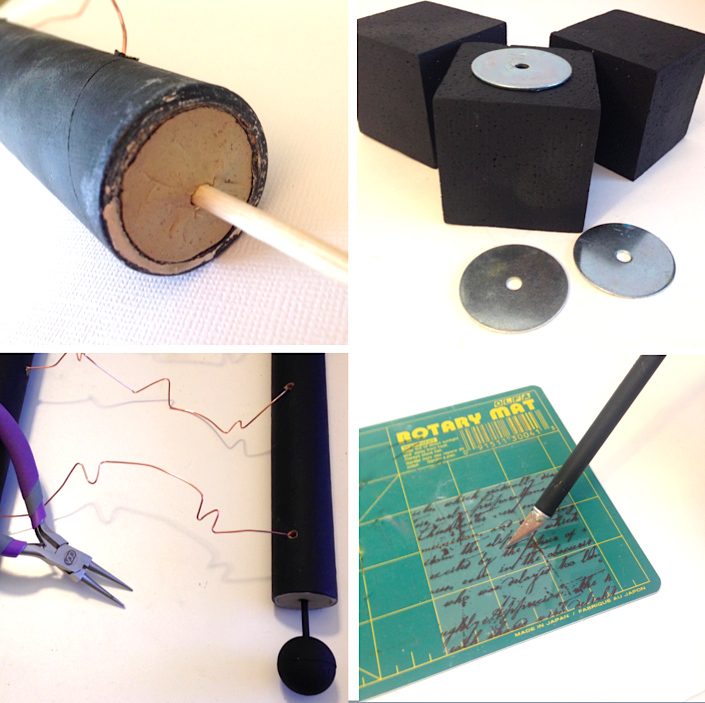
6. Push a small Smoothfoam ball on to each of three more skewers and paint black. When dry, trim the ends of the skewers down to about 2″ and push into the top of each post, through the clay, to create finials.
7. Paint three 3″ Smoothfoam cubes black. When dry, glue a large metal washer to the bottom of each cube for weight. Embellish the sides of the cubes as desired – glue on die-cuts, paint with stamps or stencils, make designs with pearl-head straight pins – so many options!
8. Bend a few random “barbs” into each wire with beading pliers.
9. When the clay plugs in each post are dry, gently sand away any rough edges and paint black.
10. Cut small X-shaped slits in each of the centers of three 3″ squares of acetate. Place the acetate to the top of each cube, using just a bit of glue in the center to secure. The acetate will help prevent the skewers from shifting.
11. Use a new skewer to make pilot holes in each cube, through the slit. Slowly push the bottom skewer of each post into each cube – make sure the post goes in smoothly and straight (perpendicular to the cube). I found it was easiest to leave the posts lying on the edge of my table first, then push a cube on to each one. Then raise the posts up and adjust as needed to straighten the posts.
Great tutorial. Thank you for sharing it with us.