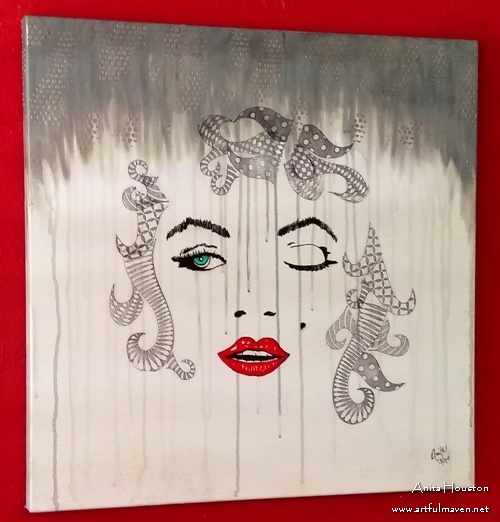
I’m calling her Artsy Lady instead of Marilyn Monroe, because I didn’t capture Marilyn’s essence with my drawing, but none the less, I was happy with my Artsy Lady painted canvas using lots of DecoArt-Media-goodness and free-handing her face with a Fude Ball Pen.
Don’t be afraid to free hand a face! Even if it doesn’t come out the way you want it, you will still have a cool and genuine piece of art that you made yourself! I promise you will be happy with the result once you are finished just like I was, even if the ideas in your head did not come to fruition. Just try it!
 Materials:
- 24 x 24 Inch Gesso Prepared Artist Canvas
- DecoArt Media Fluid Acrylic Paint: Dark Grey Value 3, Medium Grey Value 6, Translucent White, Cobalt Teal Hue, Pyrrole Red
- Ranger Dina Wakley Media: Paint Brushes
- Water Mister
- Ranger Fude Ball Pen
- Ranger Tim Holtz Distress Micro Glaze
- Stamper’s Anonymous Dylusions Stamp Set: Doodled Delight
- White Tissue Paper Wrap
- Tsukineko StazOn: Jet Black
- Ranger Multi Medium Gloss
- Tim Holtz Collection Layering Stencil: Bubble
- Palette Knife
- Wendy Vecchi Embossing Paste: Silver, Translucent
Instructions:
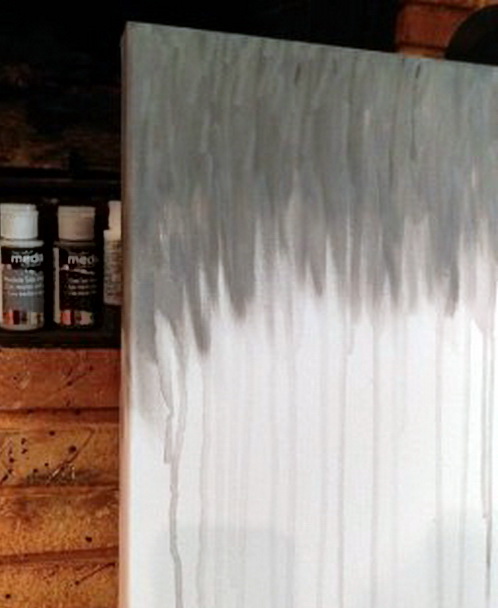 Work very quickly, so the paint does not dry. Starting at the top of the canvas, paint a one-inch row going across the top of the canvas using Dark Grey Value 3, and make your paint strokes short and vertical. Remember to also do the sides of the canvas. Add a row of Medium Grey Value 6 doing the exact same thing as before, underneath the first. Then add a row of Translucent White under this. Blend the three colors of paint in short vertical strokes, and then spray the top of the canvas with water, allowing the paint to drip down the whole portion of the canvas. Add water where you need to. Let this dry thoroughly.
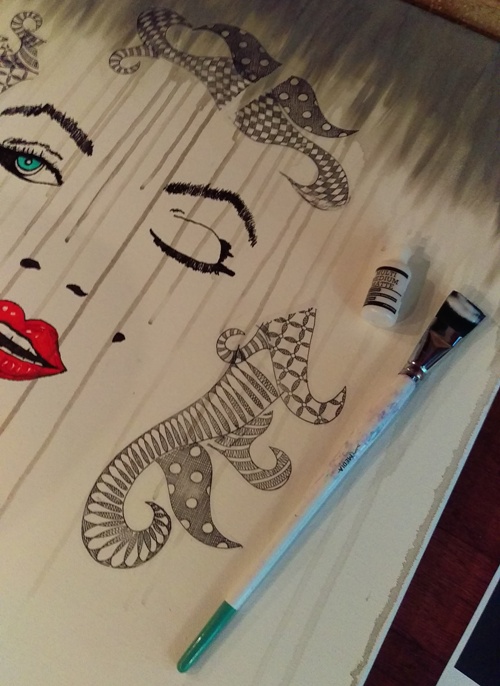
 Print out a face to use as your guide. Begin drawing on the face just as you see it from the printout, in the middle area of the canvas working from top to bottom, using a Fude Ball Pen. You might be scared to use this instead of charcoal pencil, but don’t be. If you absolutely hate it, paint over the canvas and start again. If you make slight mistakes with the pen, use a little Rubbing Alcohol and a Q-Tip to clean it up. Let this dry about 20 minutes. Rub a little Micro Glaze onto your finger, and rub this softly over the pen areas. This keeps the pen from running into the paint and sealer. Paint in the eyeball and lips with a fine brush using Cobalt Teal Hue and Pyrrole Red. Let dry.
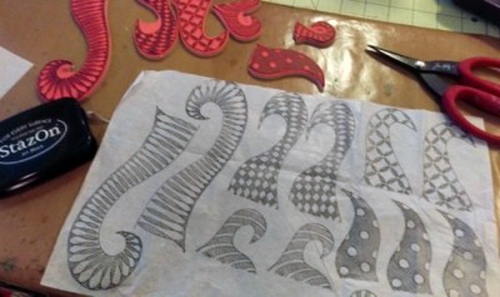 Using the Doodled Delights Stamp set and white tissue paper, stamp several of each stamp image using Jet Black StazOn. Cut these out, and arrange them on the canvas to use as her hair in three separate areas, leaving blank spaces between.
 Begin coating on Multi Medium in Gloss where you want the hair pieces to be. Place the pieces over the Medium, smoothing it out, and then add a coat of the Medium over the pieces, taking care not to wrinkle anything. Do this for all the hair pieces, layering them on. Let dry.
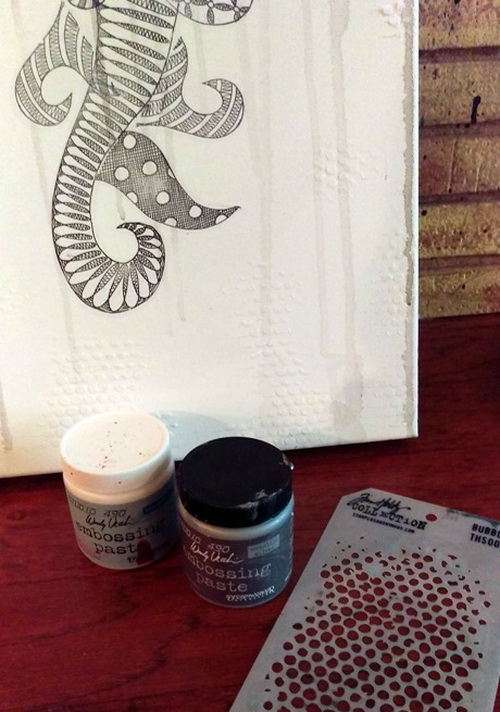 Place the Bubble Stencil over the grey areas at the top of the canvas. Using a palette knife and Silver Embossing Paste, randomly stencil in the paste, moving the stencil around various areas of the grey paint. Do the sides of the canvas as well. Let dry to a shiny metallic. Do the same thing the bottom of the canvas, over the white areas, using the Translucent Paste. Let dry, and then sign the canvas in Fude Ball Pen. When this is dry, again use Micro Glaze over the pen signature, and then seal the whole canvas with Multi Medium Gloss, making sure you don’t miss any areas. Let dry overnight.[Tweet “Best tutorial:Painted canvas with free-hand drawing and #DecoArt,Ranger #paints #inks #crafts”]
I hope you give free-hand face drawing a try, either in a journal, a canvas, whatever. Don’t be hard on yourself, and allow whatever you draw to be turned into a finished piece. To see more pictures of the finished canvas please visit my website. Until next time! ~ Anita Houston
Gorgeous canvas, Anita!
Thank you Roberta!
Oh Anita – this is such a fabulous project! I love the mixed-media techniques you used, and your free hand face is stunning – beautiful work!
Molly
Thanks so much Molly!
Wonderful canvas Anita! I think you really did capture Marilyn in this.
Thanks Carmen!
I have to disagree with you dear lady, I think you have captured the essence of Marilyn perfectly in this stunning canvas!
Aw…thanks Anne!
Wonderful canvas Anita!
Marilyn or Madonna- gorgeous either way! Love the turquoise and red with the mono background.
Thanks so much Jackie!!! I appreciate you!
This is so ultra super amazing Anita! Absolutely Fabulous! And thanks for the info on the Fude Pen. I’ve been hearing so much about it. You have made me want to try it!!
xxDaniella
Beautiful canvas! Thank you for sharing.
Oh I love this. I have these stamps from Dyan and love them just never thought about using them like this. Thank you for inspiring me. :)
Absolutely beautiful Anita!!!
Anita, your canvas is simply amazing!!! Congratulations!!!!
Greetings,
LOVE your mixed media!
Love and light,
Michele