Hello Bella Crafts lovers! Anita Houston, The Artful Maven, here today to show you an easy way to get started with one of the oldest art forms, Encaustic Wax. If you have never tried this genre of art before, then this is an easy project to introduce you to using hot wax.
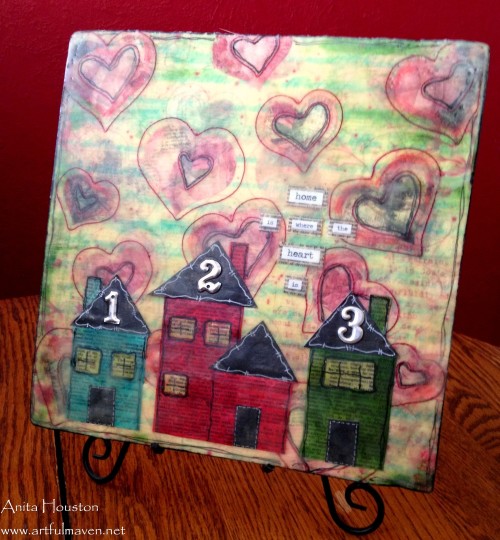
Home Is Where the Heart Is Encaustic Panel
Materials:
- 12″ x 12″ Styrofoam™ Brand Foam 1 Inch Thick Panel
- Prima 12×12 Sew Paper
- Ranger Distress Paint: Black Soot
- Dictionary Paper
- Ranger Distress Stain: Peacock Feathers, Festive Berries, Mowed Lawn, Black Soot, Scattered Straw
- Ranger Collage Glue Stick
- Sakura Gelly Roll Pen: White, Black
- Scissors
- Ranger Melt Art Wax Pellets in Clear or Natural
- Ranger Melt Pot
- Hake or Natural Bristle Paintbrush
- Ranger Heat Tool
- Tim Holtz® Idea-ology: Mini Numerals, Chit Chat Stickers, Big Chat Stickers
Instructions:
The Styrofoam Brand Panel comes with a sticky back. LOVE that! Just peel away the backing and stick on a piece of 12″ x 12″ paper.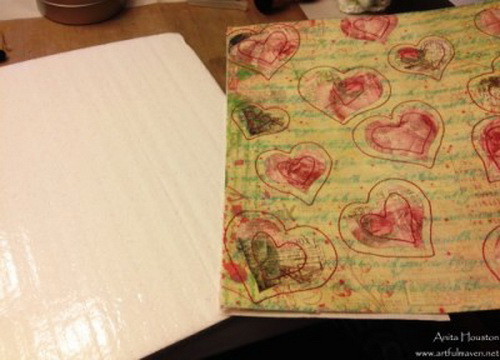
I used this sheet of paper from Prima that was in my stash, but it hasn’t been made since 2009. Trim any hang over if necessary.
Paint the sides of the panel with Black Soot Distress Paint.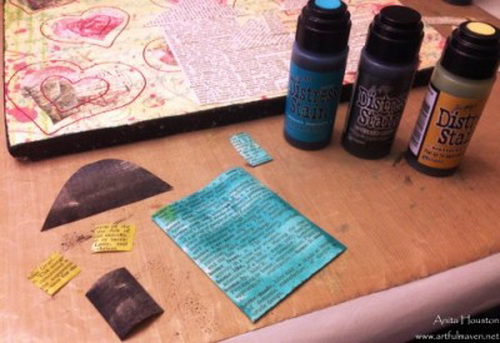
Free-hand-cut rectangles for houses, triangle roofs, door, windows, and chimneys out of dictionary paper and paint these with Distress Stain. Affix the roofs, windows, doors, and chimneys to the house bases.
Lay the houses out, and doodle around the roofs, chimneys, doors, and windows with Gelly Roll Pens.
 Heat up a Melt Pot with Melt Art Wax Pellets on the 200 degrees setting.
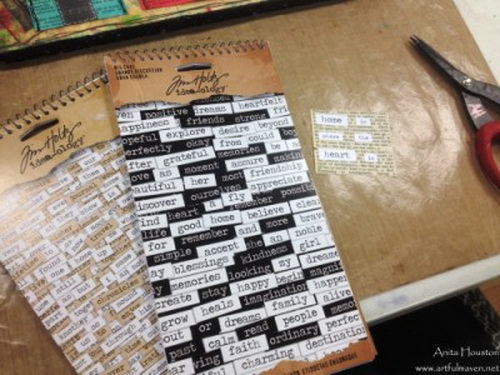 Add Chit Chat Stickers to dictionary paper to form your sentiment. Cut them apart. Have your houses and Mini Numerals ready to go. Coat on a strip of heated wax from edge to edge using the brush. Dip the brush back into the wax and add another strip underneath the previous. Continue until the whole panel is coated.
 Decide where you want your houses. Heat the area where the first house is to go with the Heat Tool Gun until it’s glossy, and lay your house down into it. Do the same with the other houses and the sentiment.
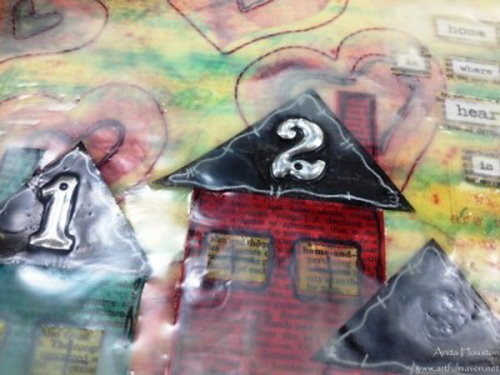 Apply another layer of wax onto the whole panel just like before, and when you get to the areas on the houses where you want your numerals, lay them into the hot wax area as you are coating the wax. Let the panel cool a little while.
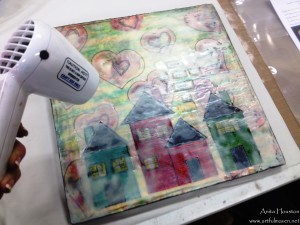
Go over the whole panel with the Heat Tool Gun smoothing out the wax until glossy. This is fusing all of the elements you added. Be careful not to overheat the wax, or your elements will move around. The wax will start to cloud up while it’s cooling, but once thoroughly cooled, it will be transparent, and you will see the whole panel clearly. It you drip wax on the sides, just peel it away. Buff the whole panel with a soft cloth or tissue to reveal a wonderful luster and shine from the wax. Display the panel away from heat sources in your home…this includes a window with full summer light. You don’t want your wax to soften.
I hope you give Encaustic Wax a try. There are so many uses for the wax in your craft projects, and all you have to do is find blogs and videos to learn more about it, including my blog, where you will see more photos of this project. Until next time, happy crafting!!! ~ Anita Houston
I’ve never tried out this technique before. The panel looks fab – thanks for super tutorial Anita. Nicola x
Hi Nicola! Thanks so much…hope you try your hand at Encaustics!
This is so cool Anita! You’ve really inspired me to finally try working with wax, thanks for sharing!
Yes, do! You will love it! Thanks!
What a wonderful technique and great share! I have all the products and maybe will tackle a smaller piece to start! Love this, Anita!
COOL! I hope you try it!!!
What a great tutorial Anita, I love what you have done with the wax, it has quite an ethereal quality to it, the houses are wonderful and I must try and find that sticky back foam board – I have the wax, just need to motivate myself…. Thanks so much for sharing this beautiful creation! Anne xx
Hope you do Anne! You will not be disappointed!
What a great tutorial. Now I have a new project to try with my melting pot!
Yes!!! I want to see when you do!
i am thinking i may have to dig mine out!! love your project!
You should! You would love this Diana!
I LOVE making encaustic art! I have been dabbling in it for a few years. It is soooo addicting!! Your piece is wonderful! I’ve never used styrofoam panel before. Now I have to try it!!
xxDaniella
Cool! Love that you are a pro! I want to see your stuff!
Great tutorial!! This is new to me but sounds like something I’d like to try – I’m thinking on a smaller scale – would make great gifts :)
Thanks so very much! Smaller and in gift form would be awesome! Go for it!!!
Awesome tutorial Anita! I have to try this!
I have been wanting to try encaustic artwork for a while now but have been a bit intimidated by the process. You made it seem so ‘do-able’ here – I can’t wait to try it!
Been wanting to incorporate wax into some of my artwork and crafted items. Thanks for this quick and easy tut!
Sandi
Artsy Craftery Studio