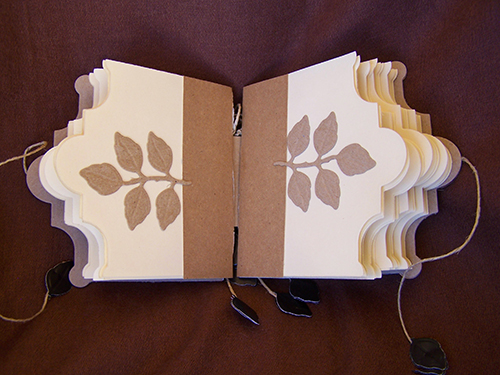
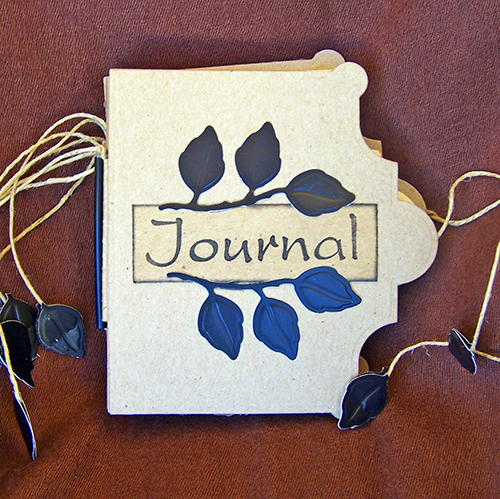
I love creating unusual handmade journals & use them through the year to jot down creative ideas & thoughts. This Falling Leaves Handmade Journal will be used exclusively for some of the thousands of quotes that I have amassed. Even though I have created it in my signature colors of black and tan, it would be lovely in any combination of colors. If you are making it as a gift, think of the receiver’s favorite colors. Or make one for each of the four seasons!
Materials:
- Chipboard heavy for the covers and lighter weight for the signature wraps (I used cereal boxes and a used flat rate envelope)
- Black card stock
- 10 sheets of ivory text weight paper
- “Journal“ stamp (3/4 x 2 ¼”), black ink pad
- Natural waxed hemp cord, large eyed needle
- Several thin black straws
- Beacon® ZipDry adhesive
- Spellbinders ™ LF-001 Creative Book Pages & S4-328Foliage die and Grand Calibur Machine
- Paper trimmer, scissors, bone folder, bull dog clips
- Japanese screw punch or awl, ruler, pencil.
Instructions:
- Die cut 4 chip board covers. Note: if using cereal boxes make sure to reverse 2 of the covers.
- Die cut the pages: fold 2 sheets of paper in half 5 ½ x 8 ½” (you can get 2 cuts across the page). Place the folded edge just inside the spine side of the die (so that you keep the fold) and die cut a total of 20 pages folded. Place the spine sides of each page to make the page a tiny bit narrower so they will nest inside each other. Trim a tiny bit from the top and bottom edge of each page before nesting the pages.
- Die cut 8 rose leaves from chip board and 8 from the black card stock.
- Cut 1 piece of chip board 2 x 5”and one piece to stamp the word “Journal”.
- Cut 4 pieces of light weight chip board 3 x 4 ¼ “.
Assemble the book:
- Create 4 signatures by stacking 5 pages.
- Score the 4 pieces of 3 x 4 ¼” chip board twice near the center (it will depend how thick your signatures are).
- Place the spine wrap around each set of nested pages. Use the ZipDry adhesive to attach the spine wrap to the outside of each signature.
- Open the signatures flat, secure on top and bottom with bull dog clips, measure & mark with the pencil 1” from the top & bottom edges.
- Use the Japanese Screw Punch or awl to punch the holes where marked…..repeat for all 4 signatures.
- Use the scissors to cut the thin straws to the correct length to fit between the two holes on the spines of the signatures.
- Cut 4 pieces of the thin linen cord to the desired length. Insert the cord into both of the holes from the inside of the signature, then insert the longer end of the cord into the bottom of the straw, tie the cord at the top of the straw. Do not trim the cord.
- Remove the clamps.
- Place a tiny bit of adhesive on the back side of the cereal box leaves & stem, position onto the front & back pages of each signature. Set the signatures aside to dry.

- Score the 2 x5” spine insert to correspond with the *thickness of the 4 signatures stacked. Feed the spine insert between the straws and the signature spines. Measure & mark with the pencil on the inside book covers where to glue the spine insert. Glue the spine insert end pieces to the book covers…..making sure that the book covers finished sides are on the outside.


- Cut two pieces of the thin linen cord and glue as ties to the inside of the round area of the front & back covers.
- Glue the inside book covers to the outside book covers. Clamp with the bulldog clips and allow it to dry.
- Remove the bulldog clips from the book covers. Glue the Journal word to the front of the book.
- Stamp the word journal onto the piece of chip board. Edge the piece with the black ink pad.
- Cut two leaves from the bottom of one of the black leaf sprigs and two leaves from the top of another. Glue the sprigs to the front cover above & below the word.
- Cut the rest of the black leaves from the stems. Sandwich & glue the ends of the spine cords & tie cords between two leaves (back to back). Clamp and allow them to dry. Remove the clamps. ENJOY!
Do you like to make handmade journals? What do you use them for? Do you keep them or give them as gifts? We’d love to know. ~ Michele Emerson-Roberts


I love journals Michele and this one is beautiful! Thank you so much for sharing it with us!
This is gorgeous Michelle! What a wonderful gift it would make. Thanks for sharing!
Stunning in it’s clean lines and simplicity, Michele.
Thank you all for the kind words. So happy that you like it. I have created hundreds of handmade journals and love everyone of them……..but this is one of my favorites.
Love and light,
Michele
OMG! Michelle your project is gorgeous. I love it!!! Great tutorial!!! Hugs!
I love your book! Bookbinding is my new favorite thing!! Absolutely fabulous!!
xxDaniella
Michele, I love book binding. This journal is stunning. I particularly love the spine!
M, D, & T…….Thanks for the kudos…..love it when the projects I create are enjoyed. I have been envolved with handmade books/binding for a number of years and never get tired of it. It will be fun creating some more new ones for Bella!
Love and light,
Michele
I’m a huge fan of journals and this one is just beautiful! I’ve been wanting to start bookbinding, and this is a perfect first project for me! :) Molly
Greetings Molly,
Delighted that you are wanting to try your hand at making handmade journals. This is one of the easiest bindings ever. Try it with different covers/page variations…….unlimited!
Love and light,
Michele
Michele I love making books and this one is great…thanks for sharing!
You are so welcome Ann. Happy that you like it.
Love and light,
Michele